Exploring Hawaii One Trail at a Time, Across Three Islands
The trails, walks, and unplanned stops that defined our Hawaii experience
LIFESTYLE


Some of my favorite moments in Hawaii happened when we weren’t trying to get anywhere at all. Before the hikes, before the viewpoints, there were moments where we simply stopped, pulled over, stepped onto a path, and walked into landscapes that felt bigger than anything we could have planned.
Before our trip, I spent time researching different hikes and walks, paying attention to terrain, elevation, and typical temperatures so I’d know what to expect and what to wear. We visited in January, and that preparation made it easier to enjoy each day without overthinking layers or footwear. I hope sharing that here is helpful for anyone planning a similar trip.
I didn’t expect walking to shape our trip the way it did. Not rushed walking or miles logged for the sake of it, but slow, curious wandering that had us stopping often, for photos, for views, and sometimes just because it felt right. Some days that meant a true hike, other days a paved trail, a short coastal path, or a quiet walk through greenery.
Those walks became the thread that shaped how we experienced Oʻahu, the Big Island, and Maui.
O'ahu ~ Coastal Trails and Iconic Hikes
Oʻahu offers a mix of coastline, busy beach areas with high rise hotels concentrated around Waikīkī, and easily accessible hiking trails just beyond the city. We stayed in Waikīkī, which made it simple to reach many of the island’s most well known walks and hikes without long drives. Much of the hiking on Oʻahu is located along the southeastern coastline, where paved paths, lookout trails, and steady climbs lead to wide ocean views. These trails feel rewarding without being overly rugged, making them a great introduction to hiking in Hawaii.
✓ Diamond Head Crater

Diamond Head is located on the southeastern coast of Oʻahu, just outside Waikiki, and is one of the most iconic hikes on the island. The trail is about 1.5 miles round trip and climbs steadily up the crater.
We scheduled a 7am entry time and took an Uber from our hotel, which dropped us off near the overlook just before the tunnel. Walking through the tunnel felt like stepping into another world, and the check in hut was immediately on the other side. Right away, the views were incredible. At times, parts of the landscape reminded me of scenes from Jurassic Park, dramatic and almost unreal.
The hike itself felt moderate, with many steps, uneven pathways, and a few narrow sections where you need to pause and let others pass. The elevation gain is noticeable, but the constant views make every stop worth it. Once at the top, you’re rewarded with sweeping views of the ocean, the island, and Waikiki below, a perspective that really shows how this part of Oʻahu fits together.
After finishing the hike, we made an impromptu decision to walk the 2.5 miles back to Waikiki instead of grabbing another ride. The weather was beautiful, and it felt like the perfect opportunity to see this part of the island up close, beyond the viewpoints and overlooks. Between the hike and the walk back, we logged about 22,500 steps that day, without ever feeling rushed or overly tired.
What to Wear: I was very thankful I wore an older pair of Brooks sneakers for this hike. Between the rocky, dirt based trail and all the walking we did afterward, they were comfortable and supportive the entire morning. Since we started early, the air was cool, so I brought a lightweight UPF hoodie to throw on at the start, even though I didn’t wear it for long once we got moving. A sun hat or baseball hat is also a must, and I was especially glad to have mine for the long walk back to Waikiki.
Cost: $10 per vehicle and $5 per person
Restrooms: Available at the trailhead
Parking: On site parking with timed entry
Reservations: Required in advance at https://gostateparks.hawaii.gov/diamondhead/about
Important timing note: If you plan to park on site, you must arrive within the first 30 minutes of your two hour reservation window or you may be denied entry. Rideshare visitors must also arrive within their 2-hour reserved window.
✓ Makapu'u Lighthouse Trail

The Makapuʻu Lighthouse Trail is located on the southeastern tip of Oʻahu and is a fully paved, out and back walk that climbs steadily toward the lighthouse. The trail is about 2 miles round trip and is wide the entire way, making it easy to walk comfortably even when others are passing.
From the moment you start walking, the views are front and center. You’re looking out over the coastline, cliffs, and open ocean almost the entire time, which is exactly why we kept stopping. Every turn felt like another angle worth capturing, and once you reach the upper viewpoints, the scenery really opens up.
The incline is consistent but not technical, and the path is shared by families, runners, and people walking their dogs without ever feeling crowded. We started this walk around 9am and spent close to two hours round trip, mostly because we stopped often to take photos and take everything in.
This was one of those walks where you tell yourself you’ll stop taking photos… and then immediately don’t.
What to Wear: For this walk, I wore shorts and a tank top, with comfortable walking sneakers that felt perfect for the paved surface. I also had a lightweight UPF hoodie in my backpack, which was helpful for sun coverage when needed. Because the trail is exposed in sections with limited shade, wearing a hat or baseball cap is important.
Cost: Free
Restrooms: None available
Parking: Small lot and nearby street parking
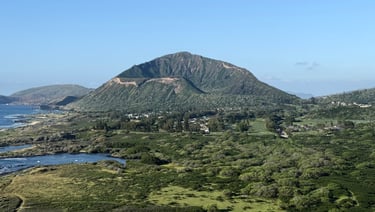
✓ Eternity Beach (Halona Cove) and Halona Blowhole

After the Makapu'u Lighthouse Trail, we also stopped at Eternity Beach and the Halona Blowhole, both located along the same stretch of coastline and accessible from the same parking area.
Eternity Beach, also known as Halona Cove, requires a steep walk down from the road. The trail entrance is closer to the roadway than you might expect, and we almost missed it at first. The descent is short but challenging, with a steep slope, loose footing, and large rocks that require careful navigation.
This is not a place to rush or pretend you’re more coordinated than you actually are.
I definitely needed my husband’s support for parts of the walk, especially navigating the rocky sections. We arrived early in the morning just after sunrise, and there was already a photographer there capturing engagement photos for a couple. I’m sure those pictures will be incredible.
The beach itself feels tucked away and dramatic, framed by cliffs and crashing waves. It’s easy to see why this location was used in the film From Here to Eternity.
Just steps away, the Halona Blowhole offered a completely different experience. It took some patience to wait for the right waves to push water through the lava tube, but we timed it perfectly and were rewarded with powerful bursts of water shooting into the air.
Cost: Free
Restrooms: None available
Parking: Shared lot for both locations. Parking fills up fast.
Big Island ~ Volcanic Landscapes and Rainforest Trails
The Big Island is defined by dramatic contrasts in landscape. Volcanic terrain, active craters, and vast lava fields exist alongside lush rainforests, waterfalls, and shaded walking trails. We stayed in Kona on the west side of the island, which meant driving across very different environments to reach places like Hawaii Volcanoes National Park and the areas near Hilo. Many of the hikes and walks here are part of larger park systems, and the terrain can change quickly from paved paths to uneven volcanic rock, making walking feel slower and more deliberate than on the other islands.
✓ Hawaii Volcanoes National Park

We made a quick stop at Punaluu Black Sand Beach before heading toward Hawaii Volcanoes National Park, which spans more than 330,000 acres on the Big Island. It’s one of the largest national parks in the country, and the drive alone gives you a sense of how vast the landscape is. While at the beach, we noticed smoke rising in the distance, which quickly made it clear that Kilauea, one of the world’s most active volcanoes, was active that day.
We arrived at the park around 10am and were fortunate to find parking before word fully spread. A park ranger recommended walking a portion of the Crater Rim Trail, which follows the edge of the volcano’s crater. We walked about two miles along the outer rim, stopping often as the views and conditions changed.
Along the way, we passed through the Steam Vents area and the Sulphur Banks Boardwalk, where thick plumes of steam were visible and audible as we walked by. The air felt warm and damp, but there was no noticeable sulfur smell, which made the area feel more approachable than expected.
Seeing lava flowing on the ground, hearing the sounds of the earth, and feeling the heat rising from the crater was surreal. We visited Hawaii Volcanoes National Park on January 12, 2026, which we later realized coincided with what was considered the 40th episode of volcanic activity at Kilauea. These episodes typically occur every two to three weeks, making the timing of our visit feel especially rare. Later in January, the 41st episode drew national attention due to increased volcanic activity and temporary park closures.
What to Wear: For this walk, I would recommend older supportive sneakers or hiking shoes, rather than boots, since much of the terrain includes paved paths and dirt sections. Temperatures can be cooler at elevation, so layers are important, especially an outer layer with sun protection. I wore leggings with pockets for carrying my phone, along with a lightweight UPF hoodie and a baseball cap for sun protection as conditions shifted throughout the walk.
Cost: $30 per vehicle
Restrooms: The visitor center was closed during our visit, but portable restrooms were available nearby.
Parking: Multiple lots throughout the park
Registration: Not required
✓ Nahuku (Thurston Lava Tube)
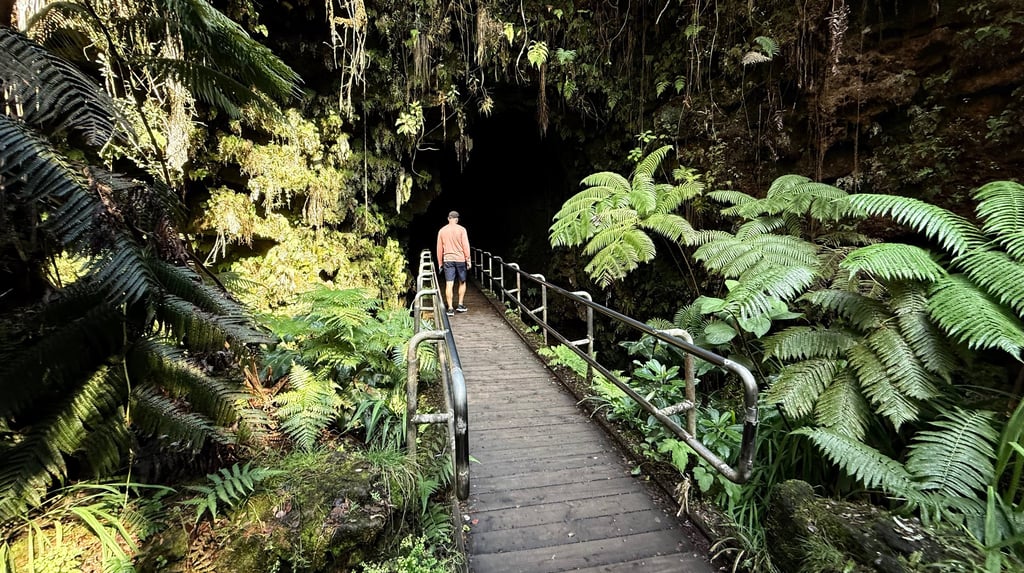
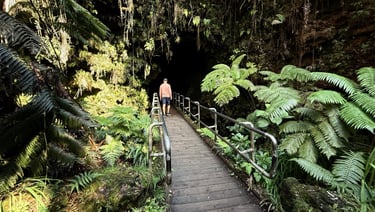
Nāhuku, also known as the Thurston Lava Tube, is located within Hawaii Volcanoes National Park and was something we visited after viewing Kilauea earlier in the day. From the Sulphur Banks Boardwalk, we followed a scenic pathway along the outer rim of the crater to reach the lava tube entrance. The walk to the tube was about 1.5 miles and felt like a natural continuation of the experience rather than a separate stop.
As we approached the entrance, the landscape shifted noticeably. The air felt cooler and damp, with thick tree roots hanging overhead at the opening. Inside the tube, the environment changes again. The walls are dark, uneven, and textured from flowing lava, with moisture visible along the rock surfaces. The lighting allows you to see the natural formations without taking away from the cave like feel, and the temperature stays cool throughout.
The lava tube loop itself is about 0.4 miles and is an easy walk with a smooth, stable path underfoot. From start to finish, this was a quick stop for us, about 20 minutes total, but it added a completely different perspective to the day and fit easily into our time at the park.
Cost: Included with park entry
Restrooms: Available near Visitor Center
Parking: Designated spaces near the lava tube entrance. Parking is very limited, and rangers shared that spots often fill quickly. This is why we chose to walk from the Sulphur Banks area instead.
✓ Kaumana Caves

Kaumana Caves are located just outside Hilo on the Big Island and are part of a lava tube system formed by lava flows from Mauna Loa. Unlike some of the other lava tube experiences on the island, this one feels much more raw and less developed.
There are two cave entrances, both tucked into lush greenery that nearly hides the openings. To access the caves, you walk down a very steep set of concrete steps. The staircase is narrow and really only allows one person at a time, so patience is important, especially when others are entering or exiting.
Once at the bottom, the cave opening feels dark and cool, with moisture everywhere. I would strongly recommend bringing a flashlight or headlamp if you plan to go beyond the entrance. We were lucky that a few people were leaving as we arrived and offered their headlamps, which made a big difference.
I chose to stay closer to the entrance while my husband explored farther inside. The cave floor is rocky and wet, and water steadily drips from the ceiling as you move deeper. He really enjoyed the experience, while I kept a close eye from the entrance, a little nervous about the uneven and slippery terrain.
What to Wear: It’s cooler inside the caves, so a long sleeve moisture wicking top is a good choice. A hat can also be helpful if you want to avoid water dripping onto your hair. If you plan to go farther into the cave, shoes with good grip are important due to the wet, uneven ground.
Cost: Free
Restrooms: None
Parking: Minimal parking near the entrance
✓ Akaka Falls Loop Trail

The Akaka Falls Loop Trail is located within Akaka Falls State Park near Hilo and is a paved loop of about 0.4 miles. It’s a short, easy walk, but one that feels incredibly immersive almost immediately.
The trail leads through dense, lush greenery with tall trees overhead, and it genuinely feels like you’re walking through a jungle. Everything feels layered and alive, with thick foliage surrounding the path as you make your way toward the viewpoints for both Kahuna Falls and Akaka Falls.
To see down into the gorge below Akaka Falls, I had to stand on my tiptoes, which gives you a sense of just how steep the drop is. While we were there, a few people were standing on the guardrails to get a better look, despite the many warning signs posted throughout the area. The drop offs are significant, and this is definitely a place where following the railings and signage matters.
What to Wear: Because much of the trail is shaded and it was cooler and slightly misty that day, I’d recommend dressing in layers. I wore biker shorts, knowing the temperature would warm up later and that we had a full day planned away from the hotel. I also wore a light rain jacket and a hat, which felt comfortable and practical for the conditions.
Cost: $10 per vehicle and $5 per person, paid at a kiosk upon arrival that is managed by park rangers
Restrooms: Located in parking lot
Parking: Paid parking lot available, or street parking outside the lot if you want to avoid the vehicle fee
Registration: Not required
✓ A Roadside Coastal Walk Along the Onomea Bay Scenic Drive

After leaving Akaka Falls, we were driving along the Onomea Bay Scenic Drive when a small pull off and trail entrance appeared almost suddenly along the road. It was one of those last minute moments where you glance at each other and say, let’s check this out. There was no fee, no formal signage, and no check in, just a shaded opening off the road and a ranger nearby.
The walk down was easy and took about 30 minutes, following a peaceful, tree covered path with very few people around. Along the way, we passed an incredible variety of flowers and plants, many of which I had never seen before. Even with the sun mostly hidden, the greenery felt layered and vibrant. The video doesn’t quite capture the colors and textures, but being there felt rich and immersive.
About halfway down, the trail split, one path continuing toward the water and another branching off to the right. We followed the main path all the way to the shoreline. Once there, we had the area completely to ourselves, with nothing but the sound of the waves hitting the rocky shore around us.
This stop was completely unplanned, but it ended up being one of the most peaceful moments of the day. Quiet, uncrowded, and tucked away, it felt like a reminder that some of the best experiences happen when you slow down and explore what’s right in front of you.
Cost: Free
Restrooms: None available
Parking: Very limited roadside pull offs
Maui ~ Lush Trails and Scenic National Parks
Maui’s trails and walking paths are closely tied to its scenic drives and national parks, and many hikes begin after a longer drive paired with multiple stops along the way. We stayed in Kihei, which meant planning full days around places like Haleakala National Park and the Road to Hana rather than quick outings close to where we were staying.
We did drive the Road to Hana, which was an experience all on its own. If you’re planning to do it, I’d recommend taking the north side route, as it offers better road conditions, clearer pull offs, and a more manageable driving experience overall. The drive itself is part of the adventure, with constant changes in scenery, waterfalls, and coastal views along the way.
The landscape on Maui is incredibly varied, from bamboo forests and waterfalls to volcanic terrain and ocean overlooks. Walking here often involves a mix of well maintained trails, more rugged sections, and shorter paths that lead to some of the most memorable views of the trip.
✓ Pipiwai Trail, Haleakala National Park

The Pipiwai Trail is located within Haleakala National Park along the Road to Hana, and is one of the more rugged trails we experienced in Hawaii. This section of the park is accessed through the Kīpahulu Visitor Center, which is important to note since Haleakala National Park has two separate sections on Maui. The trail is about four miles round trip and takes you through dense rainforest, bamboo forest, and uneven terrain with rocks, exposed tree roots, and occasional muddy sections.
This hike wasn’t about speed. It was about paying attention to where you placed every single step.
The bamboo boardwalk section was especially memorable, with the sound of bamboo swaying and tapping as you walked through it. The scenery continues to change along the trail, and reaching Waimoku Falls, a 400 foot waterfall at the end of the trail, felt like a true reward for the effort it took to get there.
After completing the Pipiwai Trail, we walked over to the Kuloa Point Trail, a short and easy path that offers views of the Seven Sacred Pools, also known as the Oheo Gulch, along with the ocean beyond. From there, we turned around and walked the two miles back the same way we came. The return hike went a bit quicker since we took fewer photos on the way out, though the uneven terrain still required careful footing.
What to Wear: For this trail, I’d recommend shoes with good traction due to the rocks, exposed tree roots, and occasional wet areas. I wore an older pair of Brooks sneakers, which worked, but if I were doing it again I’d choose hiking or trail shoes with more grip. We started in cool, misty conditions, so I wore a lightweight waterproof windbreaker that I later folded into my backpack. I was also very glad to have my hiking backpack with a water bottle, especially given the length of the trail.
Cost: $30 per vehicle
Restrooms: Available at the trailhead
Parking: On site at the Kīpahulu Visitor Center
Registration: Not required
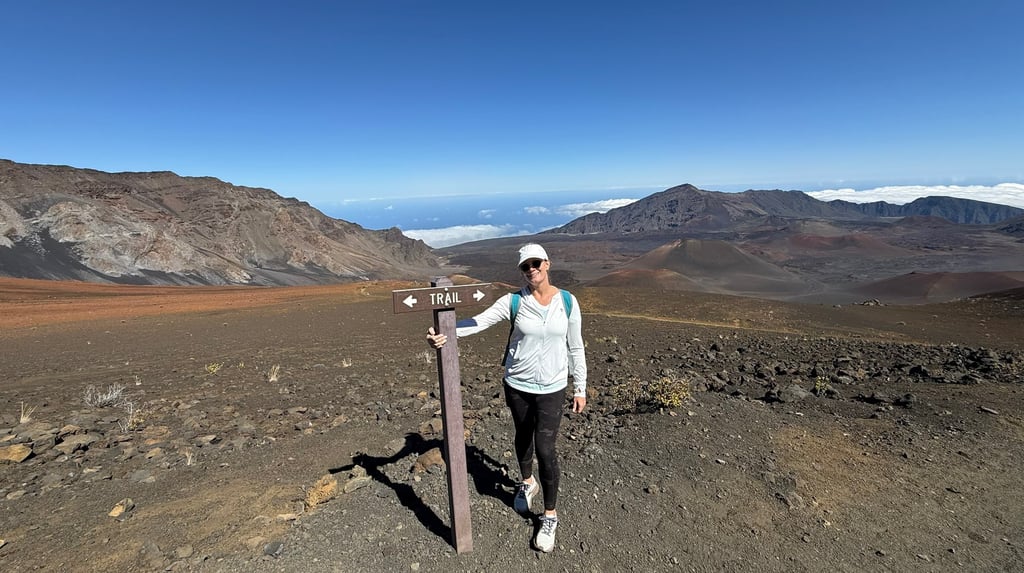
✓ Sliding Sands Trail, Haleakala Summit

The Sliding Sands Trail is located at the summit of Haleakala National Park and is accessed by driving up to the summit area, which sits at nearly 10,000 feet above sea level. Before starting the trail, we spent time walking around the summit itself. Standing above the clouds was absolutely incredible and unlike anything else we experienced on the trip. The views kept changing as the clouds moved by, and we found ourselves stopping constantly to take photos because every few minutes the landscape looked different. It was a clear day, but noticeably cool at that elevation.
The Sliding Sands Trail ended up being our most physically challenging walk of the trip, largely due to the altitude. Even before starting the descent, you could feel the thinner air.
Walking down the trail felt deceptively easy. Coming back up was a completely different conversation.
We walked down for about 45 minutes, while the return took closer to an hour and a half. I had to stop often to catch my breath and let my heart rate settle, which was easy to do because every pause came with another view worth taking in. The landscape here feels almost unreal, with wide open terrain and colors that make people compare it to Mars, and it’s easy to see why.
What to Wear: For this hike, I’d recommend layers and sun protection, as conditions at the summit can be very different from lower elevations. When we arrived, it was 51 degrees, windy, and noticeably cooler at nearly 10,000 feet. I wore leggings and layered my top with a lightweight windbreaker, which helped block the wind without feeling bulky. Because there is very little shade on this trail, a baseball hat or sun hat is important, even when temperatures feel cool. The trail is well defined, but the elevation makes it more demanding than it looks, and the fine dust along the path means you should be prepared for your shoes to be very dirty by the time you’re done.
Cost: $30 per vehicle
Restrooms: Available near the summit
Parking: Large lot available
Registration: Required only for sunrise arrivals
✓ Maui Tropical Plantation

On our last day before our flight, we walked through the Maui Tropical Plantation near Kihei. This wasn’t a hike, but it was one of the most enjoyable walking stops of the trip. The day was overcast, which actually made it a really comfortable time to explore.
The grounds are easy to walk, with paved paths, lush tropical plants, and wide open spaces. The size of the leaves alone is impressive, and the ducks clearly run the place and seem very aware of it.
In addition to walking the grounds, the plantation also offers activities like guided tours and zip lining. We arrived later in the day and chose to simply wander on foot, which ended up being the perfect way to slow down and take everything in.
What to Wear: For walking around the Maui Tropical Plantation, I’d recommend comfortable walking shoes and sun protection, as much of the area is open with a mix of shaded and exposed sections. The day we were there was overcast, which made it very comfortable, but on sunnier days a hat and sunglasses would be helpful. I wore shorts and a T shirt, which felt comfortable for walking the grounds.
Cost: Free to walk the grounds, tour and zip line additional charges
Restrooms: Available on site
Parking: Free to park in large lot
What I Wore for the Hikes and Walks

Affiliate Disclosure: This post contains affiliate links. I may earn a small commission if you make a purchase through them, at no extra cost to you.
Fit reference: I’m 5’4” and weigh about 135 lbs.
☑ Shoes
Brooks Women’s Ghost Max 2 Neutral Running & Walking Shoe (color Bright White)
These worked well for paved trails and longer walking days.Brooks Women’s Ghost 15 Neutral Running Shoe (color Spa Blue/Neo Pink/Copper)
An older pair I already owned and used on more rugged terrain.
☑Backpack
G4Free 10L Lightweight Hiking Backpack (color Teal Blue)
This was the backpack I used for all hikes. Lightweight, comfortable, and just the right size for water and layers.
☑ Bottoms
Colorfulkoala Women’s High Waisted Leggings with Pockets (size Small, color Splinter Camo)
Comfortable and supportive, with side pockets that were perfect for my phone.
CRZ YOGA Butterluxe Biker Shorts (size Small, 8 inch length, color Tie Dye Smoke)
Buttery soft, high waisted, and pocketed. Great for warmer days and for workouts.Stelle Women’s Tennis Skirt Golf Skort (size Small)
High waisted with built in shorts. I loved these on warmer days when I didn’t want to wear shorts but still wanted to feel covered and comfortable.
☑ Layers and Sun Protection
Columbia Women’s PFG Tidal Tee Hoodie (size Small, color Ocean Teal)
Easy to pull on over a tank or t-shirt, moisture wicking, and UPF 40. Mine is several years old. This is the current version.baleaf Women’s Waterproof Windbreaker (size Medium, color White)
Lightweight, packable, and great for misty days and cooler elevations.baleaf Women’s Sun Protection Hoodie ( size Small, color White)
Breathable with UPF protection, easy to wear for walking without overheating. This is an item I took on and off frequently and tied around my waist or tossed in my backpack.
☑ Hats and Sunglasses
TOP EX Cooling Ponytail Baseball Cap (Size L/XL, color White)
Breathable, UPF 50, and great for sun protection.The Hat Depot Bucket Hat (Size S/M, color White)
UPF 50, and great for full face sun protection.CARFIA Retro Polarized Sunglasses (Color Transparent Frame Green Lens)
UV protection and a great fit for small to medium faces. I own these in multiple colors.
A Few Reflections From This Trip

A few practical details made this trip smoother than expected. One of the most helpful things to know is that some national park entrance fees are valid for multiple days, which can add up to meaningful savings when you plan visits thoughtfully.
While walking shaped how we experienced Hawaii, we didn’t explore the islands entirely on foot. We drove between destinations and slowed down once we arrived, which gave us a balance that felt just right, seeing more while still taking our time to truly experience each place.
Staying hydrated was another small habit that made a big difference. Every trail and walk required more water than we expected, even on cooler mornings or shorter outings. We carried water bottles with us and kept extra water in the car so it was waiting when we finished, something I’d highly recommend.
Looking back, I wouldn’t change a thing. Hawaii has always been a bucket list destination for me, and I’m incredibly thankful for the opportunity to experience it the way we did, a mix of walking, exploring, driving, and slowing down enough to truly appreciate each place along the way.
If you're looking for more recommendations that fit this simple, feel-good life, browse my Amazon Storefront ~ I only share things I truly enjoy and use! https://www.amazon.com/shop/lifewellbloomed 🌿As an Amazon Associate, I earn from qualifying purchases (at no extra cost to you).
You Might Also Like
👉My Italy Packing List and Travel Tips You’ll Actually Use
👉A Realistic Look at Daily Life at The Villages: Our Lifestyle Preview Experience
👉What I Wore for a Lifestyle Visit to The Villages in December
👉A Simple New Year Reset: Healthy Habits to Feel Calm and Organized After the Holidays

Are You On Social Media?
Follow along on Pinterest and Facebook as I begin sharing fresh inspiration and helpful ideas. Life Well Bloomed is just getting started, and I would love for you to be part of the journey.